 Save
Save I'll never forget the afternoon my grandmother pulled out a faded quilt from her cedar chest and said, 'You know, a cake should be just like this—made of little treasures stitched together with love.' That memory stayed with me for years until I finally attempted to recreate it in cake form. The first time I arranged those colorful squares on the counter, watching them come together like a edible tapestry, I understood exactly what she meant. This Cozy Quilt Patchwork Cake isn't just dessert; it's a love letter to every moment spent creating something beautiful with your hands.
I made this cake for my best friend's birthday during a particularly gloomy November, and watching her face light up when she saw those jewel-toned squares arranged on the table reminded me why I love baking. She said it was too pretty to cut, but then took the first slice anyway, and that's when I knew it was exactly right.
Ingredients
- All-purpose flour, 350 g: The foundation of your sponge—it needs to be measured correctly, so weigh it if you can rather than scooping straight from the bag, which packs it down and throws off your ratios.
- Granulated sugar, 300 g: This creams with butter to create those light, airy crumbs that make the cake tender enough to slice into perfect squares without crumbling.
- Baking powder, 2 ½ tsp: Your leavening agent; fresh baking powder makes a real difference, so check that expiration date before you start.
- Salt, ½ tsp: A whisper of salt enhances the sweetness and brings depth to the vanilla flavor—never skip it.
- Unsalted butter, 250 g softened: Softened butter is crucial; it should be malleable enough to press your finger into easily, usually about 20 minutes on the counter does it.
- Large eggs, 4: Room temperature eggs incorporate more smoothly into the batter, creating a more homogeneous crumb—take them out of the fridge 30 minutes before you start.
- Whole milk, 250 ml: Added alternately with flour, the milk keeps the batter tender and helps distribute the flour evenly without overworking the gluten.
- Vanilla extract, 2 tsp: Pure vanilla is worth the extra cost; the flavor difference between pure and imitation is undeniable in a cake this simple.
- Food coloring gels (red, yellow, green, blue, purple): Gel colors are your friend here—they're concentrated enough to create vibrant hues without thinning your batter the way liquid food coloring does.
- Unsalted butter for frosting, 350 g softened: This needs to be at exactly the right temperature, creamy but not melting, or your buttercream will be either grainy or too soft to hold the patchwork together.
- Powdered sugar, 500 g: Sifted powdered sugar prevents lumps and creates that silky frosting texture; don't skip the sifting.
- Milk for frosting, 3–4 tbsp: Add gradually; you're looking for a frosting that's spreadable but sturdy enough to glue those cake squares together.
- Vanilla extract for frosting, 2 tsp: Same quality principle as before—this frosting tastes of vanilla, so make it count.
- Salt for frosting, pinch: Just like in the sponge, this tiny amount elevates everything.
Tired of Takeout? 🥡
Get 10 meals you can make faster than delivery arrives. Seriously.
One email. No spam. Unsubscribe anytime.
Instructions
- Prepare your pans and preheat:
- Turn your oven to 180°C and while it's heating, get your five square pans ready—grease them generously with butter, then line the bottoms with parchment paper. This step feels tedious but it's what keeps your cake from sticking and falling apart when you turn it out. If you only have one or two pans, don't worry; you'll just bake in batches, and the batter will stay fine at room temperature for an hour or so.
- Create the base batter:
- Cut your cold butter into chunks and let it sit on the counter for about 20 minutes until it's soft enough that a finger presses in easily. In a large bowl, beat the softened butter and sugar together for about 3 minutes—you're looking for the mixture to become pale, fluffy, and noticeably lighter in color. This creaming process is what traps air into your cake. Add your eggs one at a time, beating well after each addition so each egg fully incorporates before the next one goes in. Stir in the vanilla.
- Mix the dry ingredients:
- In a separate bowl, whisk together your flour, baking powder, and salt. Don't skip the whisking; it aerates the flour and distributes the baking powder evenly, which means your cake will rise uniformly instead of having dense spots.
- Combine everything gently:
- Starting with the wet ingredients, alternate adding the flour mixture and milk, beginning and ending with flour. Stir until just combined—and I mean just combined. Overmixing at this stage develops gluten, which makes the cake tough and chewy instead of tender. A few small lumps are fine.
- Divide and tint:
- Pour the batter evenly into five bowls. This is where the magic starts. Using your gel food coloring, add a few drops to each bowl and stir gently until the color is consistent—start small, because gel coloring is potent and you can always add more. Aim for jewel-tone colors that feel intentional rather than pastel.
- Bake your colored layers:
- Pour each colored batter into its prepared pan, spreading it in an even layer. Bake for 20–25 minutes, until a toothpick inserted in the center comes out clean or with just a crumb or two clinging to it—not wet batter, but not completely dry either. The cakes should spring back slightly when you touch the center.
- Cool with patience:
- Let the cakes rest in their pans for 10 minutes, then run a thin knife around the edges and turn them out onto cooling racks. This waiting period feels long, but it lets the structure set just enough that they don't tear apart when you turn them out. Let them cool completely at room temperature; warm cake is too fragile for what comes next.
- Prepare your frosting:
- While the cakes cool, beat your softened butter until it's creamy and pale, about 2 minutes. Gradually add your sifted powdered sugar, a cup at a time, beating well after each addition. Once all the sugar is in, add your vanilla and salt. If the frosting is too stiff, add milk a tablespoon at a time until it's spreadable but still holds its shape. You want it firm enough to glue cake squares together but soft enough to spread smoothly.
- Cut the cake into squares:
- Once your cakes are completely cool, trim away the edges with a serrated knife to create neat edges. Then, using that same serrated knife and marking with a toothpick if needed, cut each cake into uniform squares about 3 x 3 cm. You're looking for consistency here; similarly sized squares create a more intentional patchwork effect.
- Build your patchwork:
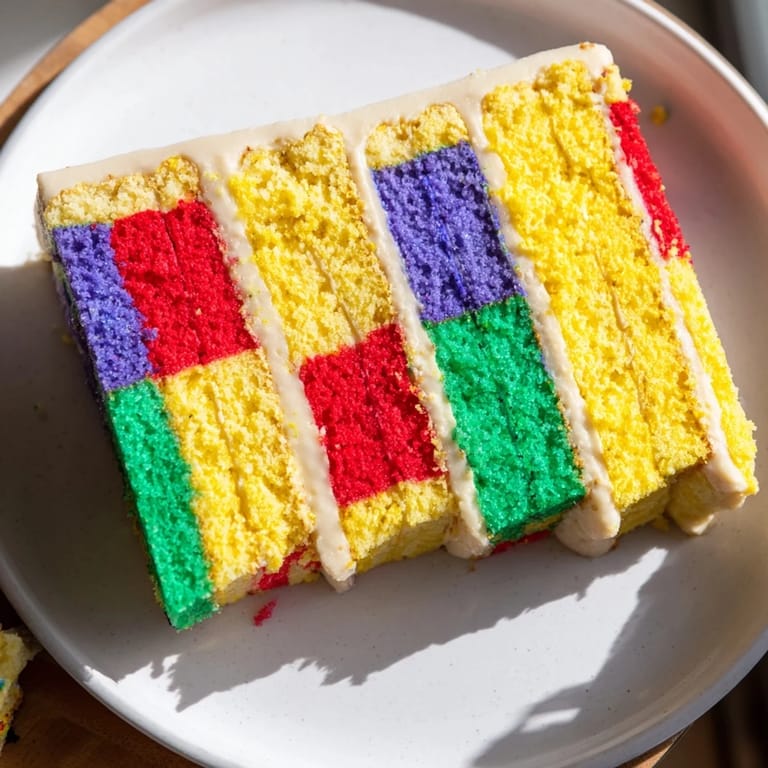
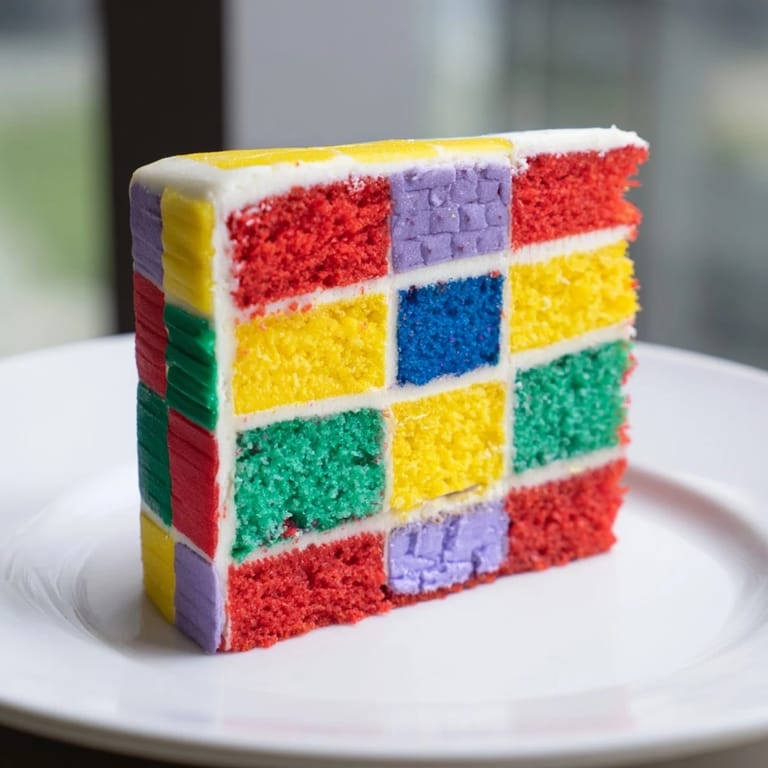
- This is the assembly that feels like playing with edible blocks. On a large serving tray or cake board, begin arranging your colored squares in an alternating pattern—think of laying out a quilt where no two colors of the same shade touch. Spread a thin layer of buttercream between each square as you place them; this acts as edible glue and holds everything together. Build upward, layering squares and alternating your color arrangement so that when someone looks at the finished cake from above, they see that patchwork quilt pattern you were picturing.
- Frost and finish:
- Once your patchwork structure is complete, spread a thin layer of frosting over the top and sides, smoothing it as evenly as you can. If you want to enhance the quilted effect, you can pipe lines of frosting between the squares using a piping bag, which also adds a decorative touch that makes the pattern even clearer.
- Chill and serve:
- Refrigerate for at least 30 minutes before slicing—this helps the frosting set and the whole cake hold together nicely when you cut into it. Serve chilled or at room temperature, and watch people's faces when they realize every layer is a different color.
 Save
Save The first person to eat a slice of my Cozy Quilt Cake looked at their plate in disbelief, seeing those perfect little squares of color stacked together, and said, 'You made this?' with such genuine amazement that I felt like I'd accomplished something far greater than just baking a dessert. That's what this cake does—it transforms you, briefly, into someone capable of creating something beautiful.
Why Patchwork Matters
There's something deeply satisfying about taking five simple cakes and transforming them into one cohesive creation through arrangement and intentionality. It teaches you that baking isn't just about following steps; it's about understanding how individual components come together to create something greater than the sum of their parts. Every time you make this cake, you get to decide on your color arrangement, which means no two Cozy Quilt Cakes are ever truly identical—much like actual quilts, each one tells a story.
Flavor Variations to Explore
The beauty of this cake's simple vanilla base is that it's endlessly adaptable to your taste preferences and the seasons. In spring, try adding a bit of lemon zest to the batter, which brightens the whole cake and pairs beautifully with the visual complexity. Summer calls for almond extract added alongside or instead of vanilla, which gives the cake an unexpected depth. Fall is your time to experiment with adding cinnamon or a pinch of cardamom to the dry ingredients, warm spices that make people wonder what they're tasting. Winter begs for a hint of peppermint extract in the frosting, or even vanilla bean paste instead of regular extract, for those little vanilla specks that catch the eye.
Making It Your Own
This recipe is a foundation for your own kitchen creativity. You might find that you prefer certain color combinations—perhaps jewel tones, or pastels, or a monochrome gradient from light to dark of a single color. You can change the frosting by adding a tablespoon of lemon juice for tanginess, or cream cheese instead of all butter for a richer flavor. You could even sandwich a thin layer of jam between the cake squares before frosting for pockets of flavor. The structure remains the same, but the possibilities are truly endless, limited only by your imagination and willingness to experiment.
- If you're making this cake ahead, store it uncovered in the refrigerator for up to two days; the cold actually helps hold the structure together.
- A serrated knife warmed under hot water and wiped dry before each cut makes slicing much cleaner and less likely to crush the delicate frosting.
- Leftover colored cake scraps are perfect eaten as little snack cakes or crumbled into a trifle with whipped cream and berries.
 Save
Save This cake is an edible reminder that the most beautiful things often require patience, planning, and the willingness to take your time. Every time you serve it, you're sharing a piece of something that took thought and care to create.
Recipe FAQs
- → How do I achieve vibrant sponge colors?
Use gel-based food coloring gels to tint each batter portion. They provide vivid hues without thinning the batter, ensuring consistent texture and color.
- → Can I prepare the sponge layers ahead of time?
Yes, baking the colored sponge layers in advance and cooling them completely before assembly helps with easier slicing and layering.
- → What’s the best way to create the patchwork effect?
Cut each colored sponge into uniform squares and arrange them in alternating colors on a tray, using buttercream frosting as a glue to hold the squares and layers together.
- → Are there alternatives for the buttercream frosting?
Buttercream is ideal for binding and taste, but lightly sweetened whipped cream or cream cheese frosting can be used for a lighter finish.
- → How should the finished cake be stored?
Chill the cake for at least 30 minutes before slicing, then refrigerate covered to maintain freshness and texture.
- → Can I make this gluten-free?
Substitute the all-purpose flour with a 1:1 gluten-free flour blend to accommodate gluten sensitivities without compromising texture.