 Save
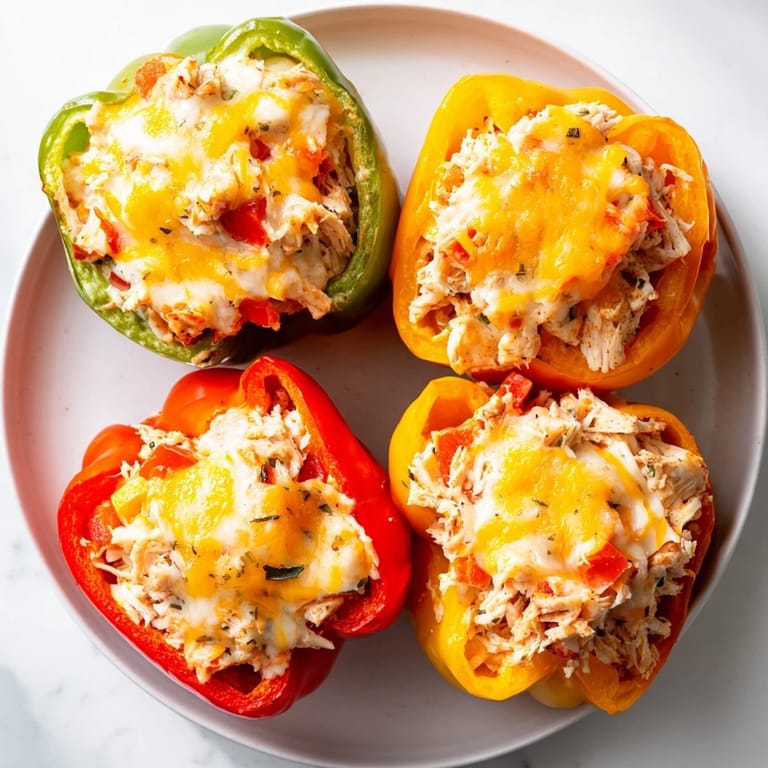
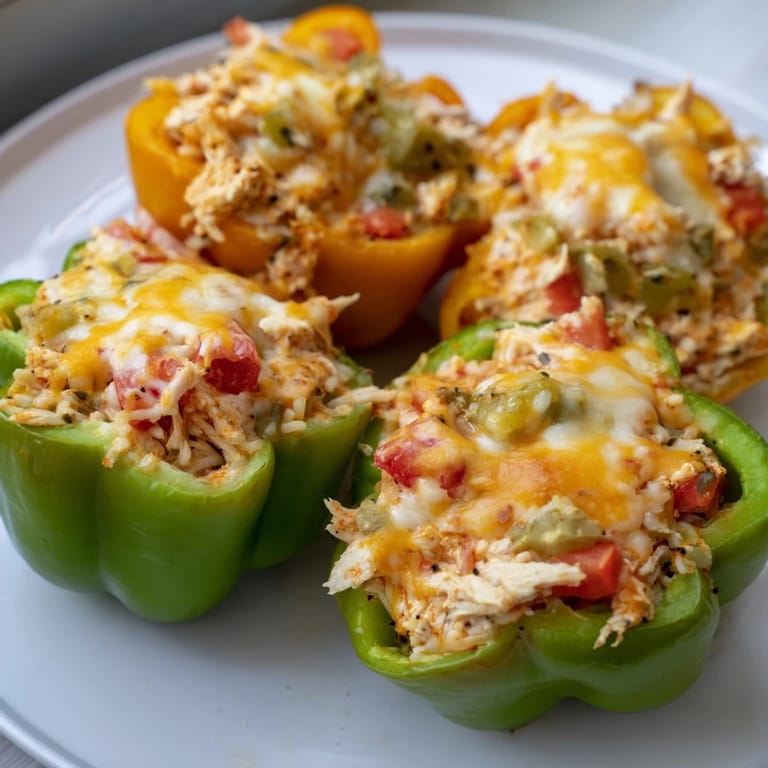
Save There's something deeply satisfying about watching a bell pepper transform into its own edible vessel. I stumbled onto this recipe on a random Tuesday evening when I had leftover rotisserie chicken, a handful of vegetables going soft in my crisper drawer, and absolutely no inspiration for dinner. Two hours later, my kitchen smelled like toasted cheese and garlic, and somehow those humble stuffed peppers became the dish my family still asks for by name. It's one of those meals that looks impressive enough for guests but honest enough to make on a weeknight when energy is low.
I made these for the first time when my sister called to say she was bringing her new partner over for dinner—nothing fancy, just casual. I was nervous about impressing them, but stuffed peppers felt approachable and homey, exactly the vibe I wanted. Watching them both go back for seconds while chatting and laughing made me realize that sometimes the most memorable meals aren't the complicated ones. They're the ones made with genuine intention and served with an open kitchen door.
Ingredients
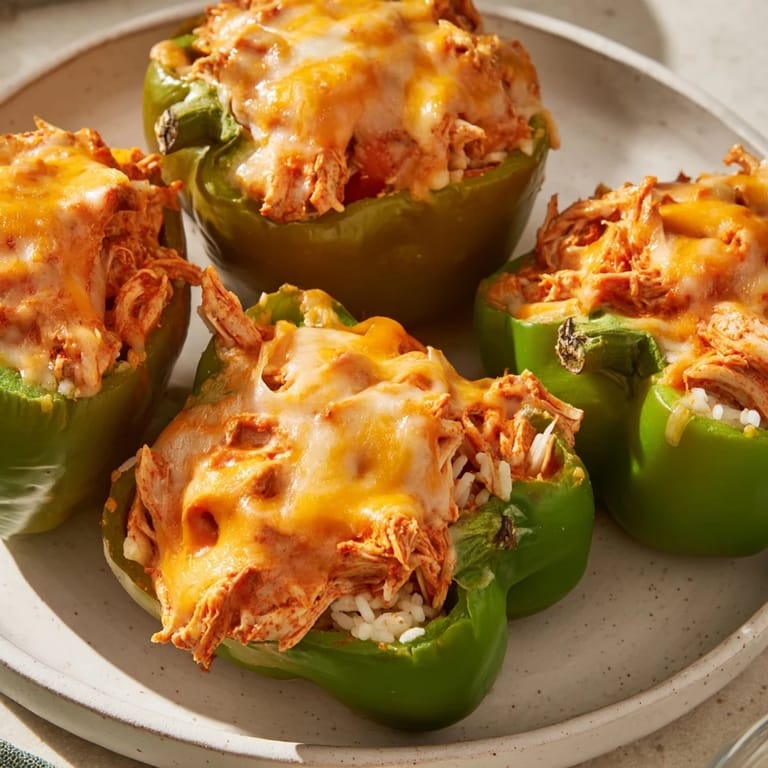
- Bell peppers (4 large, any color): Choose ones that stand upright without wobbling—it saves you from frustration during baking. I've learned that red and yellow peppers are sweeter than green, so pick based on your mood.
- Cooked chicken (2 cups, shredded): Rotisserie chicken is the shortcut that actually tastes good. If you're using your own leftovers, make sure it's seasoned enough to carry flavor through the filling.
- Cooked rice (1 cup): White rice binds everything together gently; brown rice adds nuttiness but needs a tiny splash more moisture in the filling.
- Cheddar cheese (1 1/2 cups, shredded, divided): Don't buy pre-shredded if you can help it—it melts into a slicker, less creamy texture. Block cheddar, shredded by hand, makes a noticeable difference.
- Cream cheese (1/4 cup, softened): This is the secret that keeps the filling moist. It melts into the filling and prevents everything from drying out in the oven.
- Onion and garlic: Sauté these first so they soften and lose their sharp bite. The aromatics are what make people ask for the recipe.
- Diced tomatoes (1 can, 14 oz, drained): Draining them is crucial—excess liquid turns your filling watery and your peppers soggy.
- Italian herbs (1 teaspoon, dried oregano or mixed blend): These bring warmth without complexity. Fresh herbs are lovely too, but double the amount since they're milder when dried.
- Smoked paprika (1/2 teaspoon): This small amount adds depth that makes people wonder what that subtle something is. It's the ingredient they won't identify but will miss if forgotten.
- Salt, pepper, and olive oil: Season boldly—the filling is the star, and it can handle it.
Tired of Takeout? 🥡
Get 10 meals you can make faster than delivery arrives. Seriously.
One email. No spam. Unsubscribe anytime.
Instructions
- Prep your peppers with care:
- Slice the tops off and scoop out the seeds and membranes—your fingers are the best tool here. A pepper that stands straight and tall in the baking dish is a pepper that cooks evenly and looks beautiful when plated.
- Build flavor in the skillet:
- Heat your oil over medium heat and let that onion go golden and soft, about three minutes. When you add the garlic, you'll smell it immediately—that's your signal it's done. These two minutes are what separate good stuffed peppers from forgettable ones.
- Combine the filling with intention:
- Mix everything together—the chicken, rice, cooked vegetables, tomatoes, most of the cheese, and all your seasonings. Taste a spoonful. Does it need more salt? A pinch more paprika? Trust your palate; this is your dish.
- Stuff generously but not recklessly:
- Spoon the filling into each pepper until it's full and slightly overflowing. Gently nestle them into your baking dish, tops up, like they're settling in for a nap.
- Add the steam that keeps things moist:
- Pour a couple tablespoons of water into the bottom of the dish—this creates steam that keeps the peppers tender and the filling from drying out during the first half of baking.
- Bake low, then bake high:
- Cover with foil and bake at 375°F for 25 minutes so the peppers steam gently. Remove the foil for the final 10 minutes—this is when the cheese on top browns and gets those golden, bubbly edges everyone loves.
- Let them rest briefly:
- A few minutes of cooling makes them easier to handle and safer to eat. The cheese will set slightly, and the whole pepper becomes less fragile when you transfer it to a plate.
 Save
Save I remember standing in my kitchen one weeknight, watching condensation bead on the oven window as the peppers baked, and feeling that quiet contentment that comes with making something nourishing. There's nothing complicated about this dish, yet it tastes like you cared enough to spend time in the kitchen. That's when I knew it would become a regular rotation in my dinner lineup.
Variations That Work
One evening I had spinach wilting in my fridge and threw a generous handful into the filling—it disappeared into the mixture and added color and nutrition without changing the flavor profile. Another time, I swapped half the rice for cauliflower rice for no reason other than curiosity, and the peppers tasted just as good, maybe lighter. You can play with this recipe without breaking it. Corn adds sweetness and texture. Jalapeños bring heat without overpowering. Even swapping the cheese blend—mozzarella mixed with cheddar, for instance—shifts the melting quality in interesting ways.
What to Serve Alongside
Stuffed peppers stand confidently on their own, but I always find myself wanting something fresh and bright alongside them. A simple green salad with a sharp vinaigrette cuts through the richness beautifully. Garlic bread is the indulgent choice—perfect if you're feeding people who love carbs as much as I do. A cold drink, something fizzy or herbal, rounds out the meal without feeling fussy.
Storing and Reheating
These peppers keep beautifully in the refrigerator for three to four days, which makes them ideal for meal prep or late-week dinners when you've run out of inspiration. Reheat them gently in a 350°F oven for about fifteen minutes, covered loosely with foil, until they're warm through. I've also successfully frozen them before baking—just add a few extra minutes to the cooking time if you're baking from frozen. They never taste quite as fresh, but they're still genuinely good, and that's the whole point of cooking ahead.
- Store in an airtight container and eat within four days for best texture.
- Frozen peppers work best if thawed slightly before reheating to cook evenly.
- A small splash of broth or water when reheating prevents the filling from drying out.
 Save
Save This recipe taught me that the most satisfying meals are often the simplest ones, made with ingredients you probably already have on hand. There's something quietly powerful about cooking something good for the people you care about.
Recipe FAQs
- → Can I use different types of cheese?
Yes, feel free to substitute cheddar with mozzarella, Monterey Jack, or a blend for varied flavors and meltiness.
- → Is there a way to make this dish spicier?
Absolutely! Add chili flakes, diced jalapeños, or a pinch of cayenne to the filling for a spicy kick.
- → Can I prepare this ahead of time?
You can assemble the stuffed peppers a few hours in advance, keep refrigerated, and bake just before serving.
- → What can I substitute for rice in the filling?
Cooked quinoa or cauliflower rice make great low-carb or alternative grain options without compromising texture.
- → How do I know when the peppers are done?
The peppers are tender when pierced easily with a fork and the cheese on top is melted with golden spots.
- → Can I freeze the stuffed peppers?
Yes, freeze before baking. Thaw in the refrigerator overnight and bake as directed for best results.