 Save
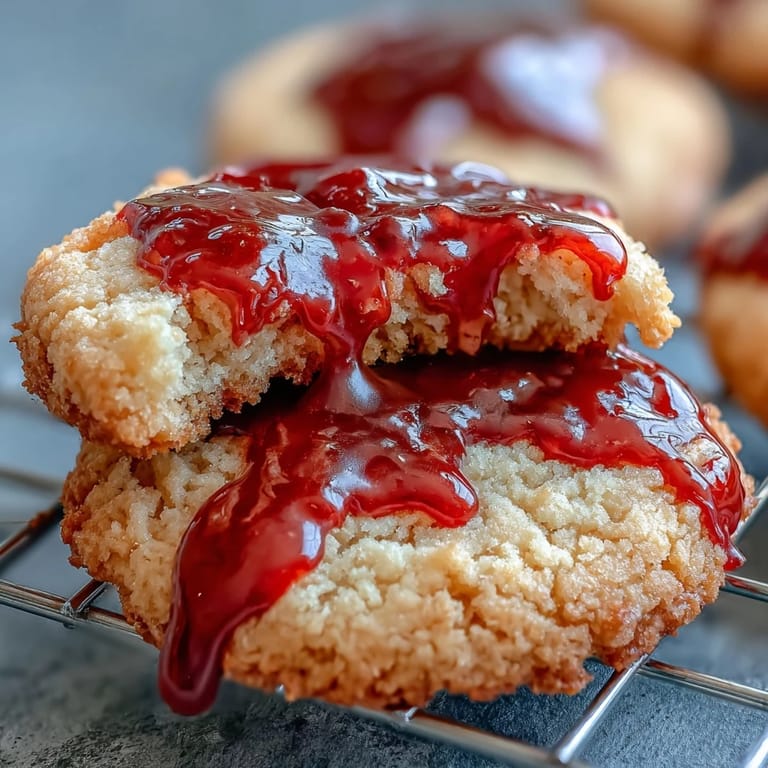
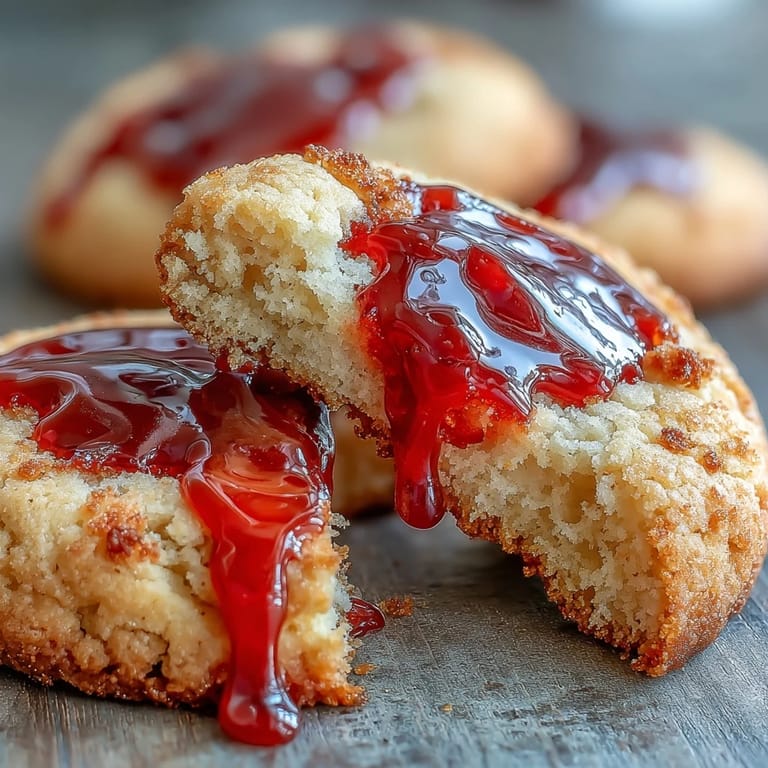
Save These Vampire Bite Sugar Cookies are the perfect Halloween treat that combines buttery, soft sugar cookies with a delightfully spooky twist. Each cookie features dramatic fang marks filled with glossy red icing that drips down like fresh blood, creating an eerie yet irresistible dessert. Whether you're hosting a Halloween party or simply looking to surprise your family with a fun seasonal treat, these cookies deliver both flavor and festive flair. The soft, melt-in-your-mouth texture pairs beautifully with the sweet, shiny red icing, making every bite a memorable experience.
Save What makes these cookies truly special is the combination of classic sugar cookie flavor with creative Halloween decoration. The base recipe produces perfectly soft cookies with golden edges and a tender center, while the vampire bite effect adds a theatrical touch that's surprisingly simple to create. Using just a straw or chopstick, you can poke two fang marks into each cookie, then fill them with vibrant red icing for a blood-dripping effect that's sure to impress. The addition of light corn syrup to the icing creates a glossy, realistic shine that elevates these cookies from simple to spectacular.
Ingredients
Tired of Takeout? 🥡
Get 10 meals you can make faster than delivery arrives. Seriously.
One email. No spam. Unsubscribe anytime.
- For the Sugar Cookies: 2 1/4 cups (280 g) all-purpose flour, 1/2 tsp baking powder, 1/4 tsp salt, 3/4 cup (170 g) unsalted butter (softened), 1 cup (200 g) granulated sugar, 1 large egg, 1 1/2 tsp pure vanilla extract
- For the Red Blood Icing: 1 cup (120 g) powdered sugar (sifted), 2–3 tsp milk, 1/2 tsp light corn syrup (for shine), red gel food coloring
- For Decoration: Black or dark red gel icing (optional, for detail)
Instructions
- Step 1: Prepare Your Baking Setup
- Preheat oven to 350°F (175°C). Line two baking sheets with parchment paper to prevent sticking and ensure even baking.
- Step 2: Mix Dry Ingredients
- In a medium bowl, whisk together flour, baking powder, and salt. Set aside for later use.
- Step 3: Cream Butter and Sugar
- In a large bowl, beat butter and granulated sugar until light and fluffy, about 2 minutes. This creates the perfect cookie texture.
- Step 4: Add Wet Ingredients
- Add egg and vanilla to the butter mixture, mixing until fully combined and smooth.
- Step 5: Form the Dough
- Gradually add the flour mixture, beating on low speed until a soft dough forms. Do not overmix.
- Step 6: Shape and Place Cookies
- Scoop tablespoon-sized portions, roll into balls, and place 2 inches apart on prepared baking sheets. Flatten slightly with your palm.
- Step 7: Bake
- Bake for 10–12 minutes, or until edges are just golden. Cool on baking sheets for 5 minutes, then transfer to a wire rack to cool completely.
- Step 8: Create Vampire Bites
- Use a straw or the end of a chopstick to gently poke two bite marks near the edge of each cooled cookie.
- Step 9: Prepare Red Icing
- In a small bowl, mix powdered sugar, milk (adding a little at a time), corn syrup, and red food coloring until a thick but pipeable consistency is reached.
- Step 10: Decorate with Blood Effect
- Using a toothpick or small piping bag, fill the bite marks with red icing, letting it drip slightly for a bloody effect. Optionally, pipe a small trail of red icing from the bites.
- Step 11: Final Details
- Add detail with black or dark red gel icing if desired. Let icing set completely before serving.
Zusatztipps für die Zubereitung
For best results, chill the dough for 30 minutes before shaping if you're working in a warm kitchen, as this makes handling much easier and prevents spreading. The cookies should be completely cool before adding the bite marks and icing, or the icing will melt and lose its dramatic effect. When mixing the red icing, add milk gradually—start with 2 teaspoons and add more only if needed. The icing should be thick enough to stay in place but fluid enough to create natural-looking drips. Use gel food coloring rather than liquid for more vibrant color without thinning the icing. A toothpick works perfectly for filling small bite marks, while a piping bag gives you more control for creating drip trails.
Varianten und Anpassungen
These cookies are wonderfully versatile and can be adapted to suit different tastes and dietary needs. For an almond-flavored variation, add 1/4 teaspoon of almond extract to the dough along with the vanilla. If you need a gluten-free version, substitute the all-purpose flour with a quality gluten-free flour blend in equal measure. You can also experiment with different icing colors—green for zombie bites, purple for monster marks, or even black for gothic drama. For a more sophisticated presentation, dust the finished cookies with edible pearl dust or add silver dragées around the bite marks. If you prefer a chocolate twist, substitute 1/4 cup of the flour with cocoa powder for chocolate vampire cookies.
Serviervorschläge
These Vampire Bite Sugar Cookies shine as a centerpiece at Halloween parties, displayed on a black serving platter or arranged on a tiered stand for dramatic effect. Pair them with hot chocolate topped with marshmallows for a cozy autumn treat, or serve alongside mulled wine for an adult Halloween gathering. They also work beautifully as party favors when wrapped individually in clear cellophane bags tied with orange and black ribbons. For a complete Halloween dessert table, arrange them alongside other spooky treats like spider cupcakes or ghost meringues. The cookies stay fresh for up to 5 days when stored in an airtight container at room temperature, making them perfect for preparing ahead of your celebration.
 Save
Save These Vampire Bite Sugar Cookies are more than just a Halloween dessert—they're an experience that combines baking tradition with creative fun. The simple sugar cookie base is a reliable recipe you'll want to use year-round, while the vampire decoration makes them seasonally special. Whether you're baking with children who love the spooky details or creating treats for an adult Halloween party, these cookies deliver the perfect balance of flavor, texture, and theatrical presentation. The joy of watching guests discover the bite marks and admire the glossy red icing is almost as satisfying as eating them. So gather your ingredients, embrace your creative side, and let these vampire cookies bring some delicious fright to your Halloween festivities.
Recipe FAQs
- → What gives the cookies their soft texture?
The balance of softened butter and sugar creamed together, along with a moderate baking time, creates a tender and soft cookie base.
- → How is the red icing made shiny?
Adding light corn syrup to the powdered sugar and milk mixture creates a glossy finish that mimics blood's shimmer.
- → Can the cookies be decorated differently?
Yes, dark gel icing can be used to add extra details or shading to enhance the bite marks and overall effect.
- → Why chill the dough before baking?
Chilling firms the dough, making it easier to handle and helping maintain cookie shape during baking.
- → What tools are recommended for decorating the bite marks?
Use a straw or chopstick to create the bite impressions, then a toothpick or small piping bag to fill with icing.