 Save
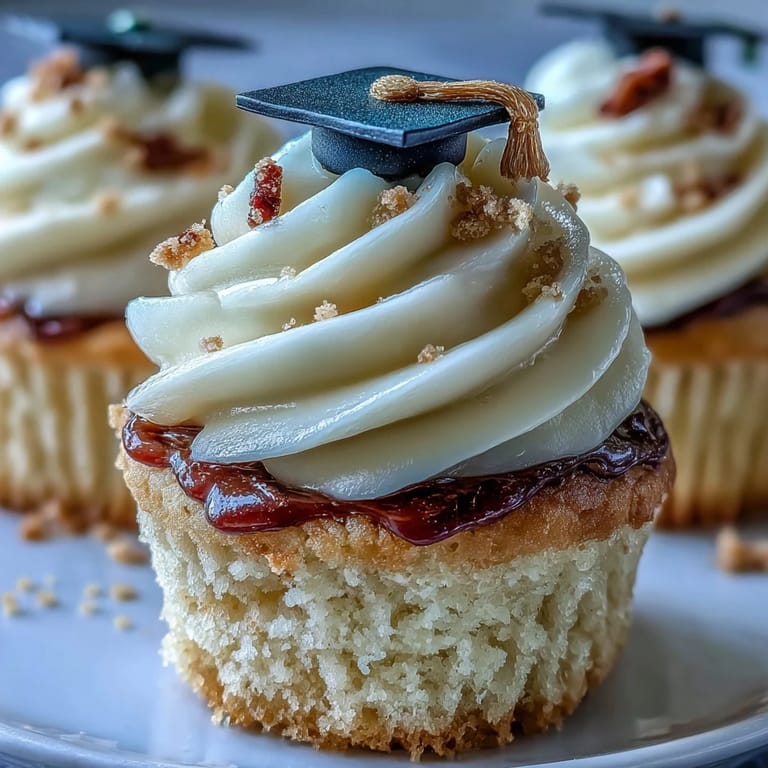
Save The aroma of freshly baked cupcakes has a way of transforming even the most ordinary afternoon into a small celebration. When my kitchen filled with the sweet scent of vanilla during exam season, stacking tiny fondant caps on buttercream swirls felt just as victorious as walking across the stage. There was a gentle hum from my mixer and the tentative excitement of making something a little showier than my usual treats. There’s something uniquely satisfying about seeing a row of black-and-gold topped cupcakes catching sunlight on the counter. Each one felt like a tiny trophy waiting to be claimed.
Last June, my neighbor's daughter graduated high school, and we agreed cupcakes would trump a sheet cake any day—mainly because you can hand one to every beaming graduate without a fuss. My hands dusted with cornstarch, I laughed at our collective attempts to make the fondant tassels; the kitchen echoing with joking predictions of future Valedictorians. These cupcakes didn’t just get devoured—they got photographed, paraded, and even snuck into gift boxes on the way out the door.
Ingredients
- All-purpose flour: I always use regular flour for a tender crumb and sift it if I want a little extra lightness.
- Baking powder: This classic leavener gives the cupcakes their happy rise—make sure it's fresh for the fluffiest texture.
- Salt: Even a pinch brings out the sweetness, preventing everything from tasting flat.
- Unsalted butter: Softened butter is the key to a dreamy crumb and a creamy frosting; set it out before you start.
- Granulated sugar: White sugar keeps the vanilla flavor uncluttered and lets the focus stay on the caps.
- Eggs: Room temperature eggs blend in smoother and help the batter hold together beautifully.
- Vanilla extract: Pure vanilla makes these taste bakery-quality—I always sneak in a drop extra.
- Whole milk: Adds richness and moisture; I’ve swapped for plant milk in a pinch and no one noticed.
- Powdered sugar: For that cloud-like frosting, sifted so it’s never lumpy.
- Black fondant: Essential for those classic graduation caps—work quickly and keep it covered so it doesn’t dry out.
- Gold fondant: Makes for standout tassels and little flourishes; rolling thin ropes takes some practice but pays off.
- Cornstarch: Prevents fondant from sticking and keeps the caps neat—just a dusting does the trick.
- Edible adhesive or water: The gentle glue that holds the caps together (water really works just fine in my experience).
- Edible gold dust: For extra sparkle, dusted on like a finishing wish—totally optional, but delightful.
Tired of Takeout? 🥡
Get 10 meals you can make faster than delivery arrives. Seriously.
One email. No spam. Unsubscribe anytime.
Instructions
- Warm up the oven:
- Preheat to 350°F and line a muffin tin—there’s something cheerful about the anticipation as you prep those paper liners.
- Mix the dry ingredients:
- Whisk flour, baking powder, and salt together until you can’t spot any streaks of powder left.
- Cream the butter and sugar:
- Blend butter and sugar until pale and airy; when it looks fluffy, you know magic’s happening.
- Add eggs and vanilla:
- Beat in eggs one at a time, letting each fully disappear before you add the next, then stir in vanilla for that warm aroma.
- Combine and add milk:
- Mix dry ingredients into the creamed mixture, alternating with milk; the batter should feel smooth, never overmixed.
- Fill and bake:
- Spoon into liners about two-thirds full, bake for 18–20 minutes, then breathe in the vanilla as the tops turn golden; cool them thoroughly.
- Make buttercream:
- Beat butter, powdered sugar, milk, vanilla, and a salt pinch until you get soft peaks—taste as you go and adjust sweetness.
- Pipe or spread frosting:
- Cover cooled cupcakes with a generous swirl or smooth dome, whichever makes you smile.
- Prepare fondant caps:
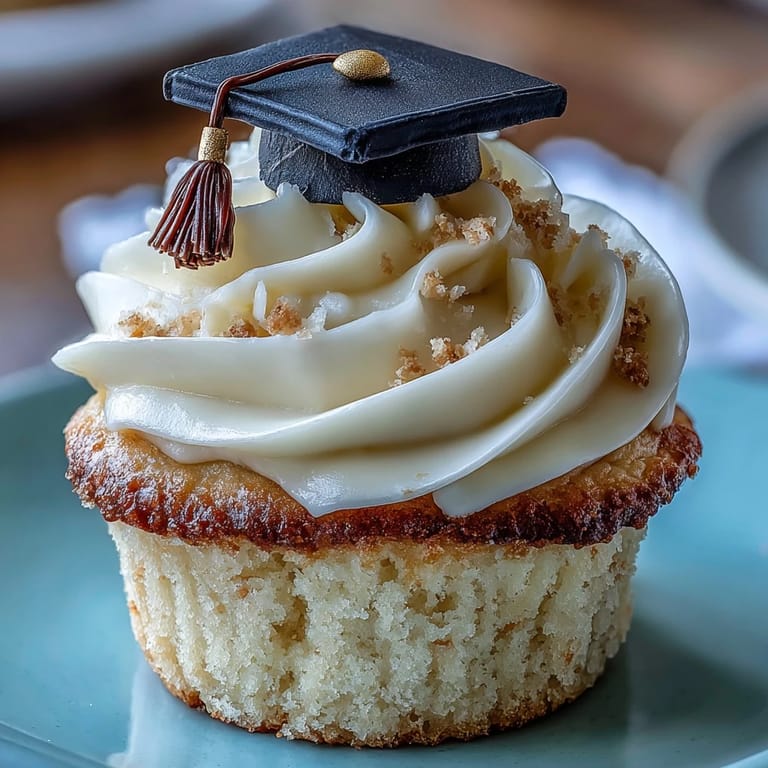
- Roll out black fondant with a dusting of cornstarch and cut 12 tidy squares, then roll 12 little balls and flatten to make the bases.
- Assemble caps:
- Stick a square atop each ball with a dab of water or edible glue, pressing gently until it holds together.
- Add tassels and finish:
- Roll gold fondant into skinny ropes for tassels, stick them on, and top with a tiny ball; dust with gold if you’re feeling festive.
- Decorate and serve:
- Top each cupcake with a fondant cap and watch your display come together in sparkling black and gold.
 Save
Save During one memorable graduation party, a quiet moment stuck with me—the new graduate taking a photo, eyes lit up because the cupcakes matched her school colors exactly. Suddenly the kitchen laughter and nervous rolling of fondant felt like part of a much bigger celebration. That’s when I realized these cupcakes were more than sweets; they became a piece of the milestone itself.
Fondant Cap Secrets From My Own Attempts
The first few times I made fondant caps, my squares were closer to abstract art than geometry class. Letting the fondant sit for a minute after rolling (so it dries just a touch) made cutting straight lines much easier. If your shapes aren’t perfect, remember that edible shimmer distracts from any minor flaw. Keeping my hands dusted lightly with cornstarch also solved any sticking issues as I worked.
Hosting Tips for Graduation Parties
Setting up a decorating station was a spontaneous hit—everyone wanted to try making a cap or piping on extra buttercream. I noticed guests appreciate do-it-yourself treats, especially when the occasion feels so personal. Make extra gold tassels ahead of time for little hands (and big ones) who want to play with edible art. And always have wipes handy—fondant is fun but nearly everything ends up sparkling.
Variations and Make-Ahead Tricks
Chocolate cupcakes swap in seamlessly if your crowd prefers a richer base. I’ve also made these with dairy-free butter and oat milk for a vegan twist, and they’re just as impressive. Store finished cupcakes in a container overnight so fondant details set nicely without losing softness.
- Brush a hint of edible gold dust on the caps right before serving for a photo-ready finish.
- If fondant dries out, knead in a touch of shortening—not water.
- Wrap leftover fondant tightly in plastic to save for another festive day.
 Save
Save Here's to celebrating big achievements with tiny edible trophies that bring everyone together. May your kitchen be filled with triumph and enough frosting to go around.
Recipe FAQs
- → How can I keep cupcakes moist after baking?
Cool cupcakes completely, then store in an airtight container at room temperature for up to 24 hours. For longer storage, refrigerate in a sealed container and bring to room temperature before serving to restore tenderness.
- → Tips for smooth, pipeable buttercream?
Use softened unsalted butter and sifted powdered sugar. Beat butter until creamy before adding sugar slowly, then add milk and vanilla and whip until fluffy. If too stiff, add a teaspoon of milk; if too loose, add a little more powdered sugar.
- → How do I prevent fondant from sticking while rolling?
Lightly dust your work surface with cornstarch or powdered sugar and thinly coat the fondant. Roll gently and lift often, adding small amounts of dust only as needed to avoid drying the fondant.
- → What’s the best way to attach fondant caps to cupcakes?
Use a small dab of edible adhesive or a touch of water to attach the fondant square to the flattened base. Press gently to secure, then place the finished cap on top of the buttercream; the frosting helps anchor the cap.
- → Can I make fondant caps ahead of time?
Yes. Shape caps and tassels, then let them dry slightly on a cornstarch-dusted surface. Store in a single layer in an airtight container with parchment between pieces to prevent sticking; finish with gold dust just before serving.
- → Suitable substitutions for dietary needs?
For a dairy-free option, use plant-based butter and a non-dairy milk in both cupcakes and buttercream. Be sure to check fondant labels for allergens and choose vegan-friendly brands if needed.